|
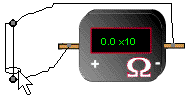
By default, this element is a thin nichrome wire of length 181 cm, which gives it a resistance of 40 ohms. Both the kind of wire and wire length can be changed in the element's Properties Box. You can also change the length manually in either Run mode or Stop mode. For kinds of wire, you have four choices: thin nichrome, thick nichrome, thin copper, and thick copper. Nichrome is much more resistant than copper, and thin wires have greater resistivity than thick wires. Changing wire kind also changes the element's appearance (Figures 1-3 above). To change the length manually, click on the hotspot (wire loop) indicated in Figure 4. To increase length (and hence resistance), drag the hotspot upward (Figure 5). To decrease length, drag it downward. Length can have any value between 0 and 400 cm. (Note: The ohmmeter is used here to illustrate how the resistance changes when you move the hotspot. The ohmmeter is not actually available in the Electric & Magnetic Devices Simulator.)
|