Graph Tool: The Graph Tool plots two variables against each other dynamically. It functions only in Run mode. You must select the variables to be plotted. Place up to ten graph tools anywhere in the simulation window. With Select depressed, you can move and resize the graph tool in Stop mode. In the graph tool's Properties Box, you can set a wide variety of properties. These properties are discussed in detail under the topic headings listed below.

Table of Contents. Click on the topic of interest.

What Can I Plot?

Choosing Scale Mode
Setting Axis Variables & Scales
Miscellaneous Properties
Rises and Runs
Graph Example


What Can I Plot? In Interactions & Motion, you can plot:
  • Time, as kept by the clock. The default scale label for time is sec.
  • Particle (Body Element) Parameters. For each body element that has been placed, the following parameters can be plotted:
    • Distance: distance from origin along either the horizontal or vertical axis. The choice is driven by the direction of motion. Default scale label is m (meters).
    • Speed: Actually, the horizontal or vertical velocity rather than the velocity magnitude. "Speeds" can be eith positive or negative. Default scale label is m/s (meters per second).
    • Net Force: Horizontal or vertical. The choice is driven by the direction of motion. Default scale label is N (Newtons).
Return to Contents


Scale Mode: Before you choose variables, you should decide which Scale Mode to use. If you choose Auto Scale Mode, the simulator chooses the axis scales for you. If you choose Hand Scale Mode, you must set the axis scales yourself.

We suggest that if you know what range of values will be plotted, or can make an educated guess, choose Hand Mode. You will generate a better-looking graph that is easier to interpret than one drawn in Auto Mode.

If you don't know what range of values will be plotted, choose Auto Mode. Once the graph has been generated, you will know the range of values. Most of the time, you can then replot the graph in Hand Mode.

Return to Contents


Axis Variables: Choose the Vertical and Horizontal variables to be plotted from among those listed in the pull-down menus. See What Can I Plot? to find out which variables you can plot and how to get them to those variables to appear on the pull-down menus.

Scaling the Axes (Hand Mode ONLY [see Scale Mode]): Set the following properties for each axis:

  • Begin value: The minimum axis value at the graph's origin.
  • Step value: The distance between each notch on the axis in units of the variable being plotted. This value must be positive.
  • Step size: The size of each step, in pixels. The default value is 20. The minimum step size is 10 pixels and the maximum is 50 pixels.

    The maximum graph size is approximately 200 X 200 pixels. Thus, the axis
    end value ( maximum axis value) for a graph of maximum size is:

    end value = begin value + (step value x [200 pixels / step size])
  • Scale label: The label indicating the units of the axis variable. In most circumstances, the default label displays the correct units. See What Can I Plot? to find out what the defaults are.
Return to Contents


Miscellaneous properties.

Options

  • Show marker: Show the marker that traces the plot.
  • Clear graphic: Clear the graph when you click Apply or OK.
  • Dynamic scaling: Auto Mode only. If chosen, the graph automatically redraws itself when the marker moves off the graph. Leave this box checked.

Refresh time: How often the graph tool draws a new point. In most circumstances, you will want the shortest time--100 ms, or 0.1 seconds. This is the default value.

Step precision: The precision with which the graph tool determines step values. If you have a step value less than 1, choose a step precision of 3.

Return to Contents


Rises and Runs properties: The Rises and Runs feature lets students use a triangular approximation to determine the rate at which the vertical variable is changing with respect to the horizontal variable. For example, if the graph tool is plotting velocity against time, the Rises and Runs feature lets students approximate the acceleration.

The Rises and Runs feature only works if the vertical variable increases or decreases monotonically with respect to the horizontal variable. If changes are not monotonic, the simulator informs the user that the Rises and Runs feature does not work. Then it turns off the feature.

Rises and Runs: Turns on the Rises and Runs feature.

Shade segments: Shade regions under the curve formed by each "rise" and "run."

Number of segments: Number of rises and runs.

Return to Contents


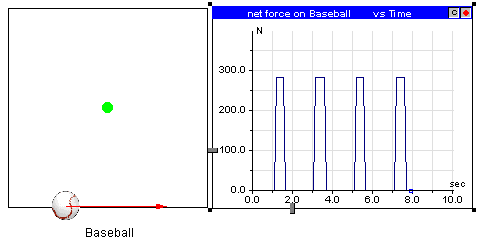
In the figure below, the graph tool plots net force acting on the object Baseball (the vertical variable) against time (the horizontal variable), which is confined to a square path. For net force, the begin value is 0, the step value is 50, and the step size is 20 pixels. For time, the the begin value is 0, the step value is 1.0, and the step size is 20 pixels.

In the top right corner of the graph, clicking on the C with Select depressed clears the graph. Rolling the mouse over the dot turns the graph on or off. The graph is on when the dot is red and off when the dot is black.

The silver-gray sliders on the left and bottom of the graph allow you to adjust the horizontal and vertical scales of the graph, but only in Stop mode and only if you chose Hand Mode. In Run mode, the scales revert to the values specified in the Properties Box.

Return to Contents